Friday, April 25, 2014

Week 12: Finishing up

This week we really just tweaked things and put everything together, more than anything we spent more time writing up our post mortems and preparing for the final presentation. thus this final post is more of a showreal of what the end product is and some stills.


Week 10-11: textures

These last two weeks I've been making diffuse,  normals and emissives for the vehicles and a diffuse and alphas. for the vehicles I used a base metal with a layer of dark grey to wash it down. for the rest I used block colours of grey to highlight details and crevasses with lights being a blue to white gradient. here are the final vehicles in game.


For the rocks I used the new sediment texture Kyle was now using and edited it to bleed nicely into the base of the canyon. Creating the alphas proved to be a real challenge as it wasn't behaving as I intended, ultimately i had to go into Photoshop and tweak each section of transparency until the all worked as intended.
on of the pillars in game.

Week 9: Texturing and resizing the bridge

The main focus this week was texturing all those vehicles, unfortunately I've decided to can two of them due to limitations, the U.A.V.cant be implemented into gameplay and the alien fighters drop bombs onto the map making my bombers pointless. Great shame but it means I now have more time to develop the other two

The main challenge this week was re UVing my bridge, as April wanted to texture them to fit with her boss (She became team leader back in week 7 due to arguments she is running a tight ship and is getting the most out of us) However we realised the canyon was far wider than we thought and so my bridge was naturally way too small, for the presentation we duplicated them but I have since made ones 4 times the size, thus making Aprils texture not fit...
...until I re-UVed it to fit within the parameters of the original meaning neither of us had to re-texture anything. Here is the result

Week 8: Rocks and Bridge

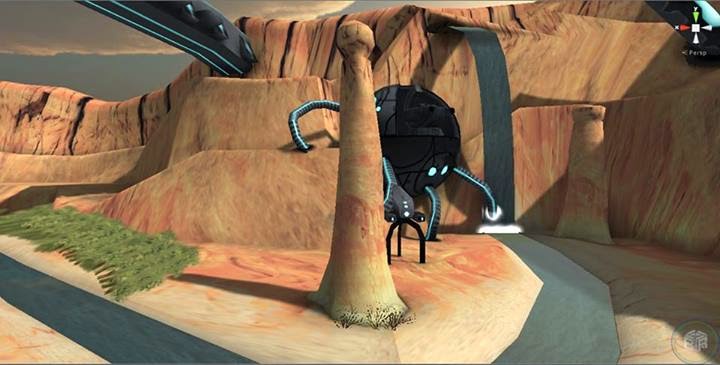
Kyle will continue on with tweaking the canyon walls without me at this stage as we need objects to populate the level more, so I created some pillars similar to those found in the Grand Canyon. my first renditions captured the basic shape of the pillars but are too low poly...

...so after feedback I created these four larger and more detailed pillars which fit in better with the design of the canyon walls, emulating the random erosion often found in the real life pillars.

For the UV texture I separated the top face and base from the main structure to avoid stretching, Rob suggested flattening the UVs out like I did with the canyon walls but having tried it this wasn't  very effective and had serious stretching at the top.

Earlier in the process Adam had the task of creating alien bridges to house the turrets on but I took on this task as he had other tasks to complete. The group was also unhappy with the designs he had posited as they deviated from the bridge idea and were really pipes which we had said wouldn't fit with the rest of the level.
Saying this I did understand where Adam was coming from and incorporated his idea to a degree so as to please everyone without compromise.

Me being given this role actually worked out for the best as I had the most up to date models of the turret so I could work around making them fit on the platforms.

Week 7: Canyon and rocks

Rob suggested the approach of creating a handful of modular pieces and baking very high poly textures down (Kyle showed me a quick and effective way of doing this in Z-brush using a mask which would be shared throughout all the pieces) we decided to give it a try and see if a modular approach would do the level justice.


Above Is the plan we came up with, each colour represents a segment that would then be repeated in its allotted slots. As it turns out we could make four distinct modular pieces and so we tried the method however it fell really short of the look we wanted and we abandoned it for the superior results that came from our baking segments cut out from the original mesh created by Kyle.
To get these results we exported a segment of the canyon that had added divisions into Z-brush where we would subdivide it until it was smooth. at this stage we applied the  mask that all the rocks in the canyon would share and increase the deformation in each axis individually in the deformation tab to create a rocky surface. we then baked them down in X-normals and added the same texture to them all.
Low poly mesh

High poly mesh to be baked

Week 5 & 6

Very little happens in week five other than tweaking UVs to be more efficient after feedback from Rob. however Week had many developments with the changing of team leaders from Kyle to Adam due to the units rules. I was re-tasked with helping Kyle with rocks, the canyon and terrain and initially Adam took the responsibility of texturing my assets off me to do himself, however this did not last as Adams vision of the textures (pictured below) did not match what I intended and clashed with the theme myself and April had established.
This did halt productivity for a day or two as we adjusted to the number of changes but things are now running smoothly. Myself and Kyle are now discussing the best way to tackle UV and texture the Canyon.

Week 4: vehicle models tweaked and UVs

This week I was working more on other units to balance out workflow across the board so very little has changed other than the vehicles being completely modelled and UVd. This did take some time as surfaces were disappearing when connecting them in the UV texture editor. After an import and export into a fresh document and deletion of an overlapping face this issue was eventually resolved.